Friday, May 15, 2015
Wednesday, December 11, 2013
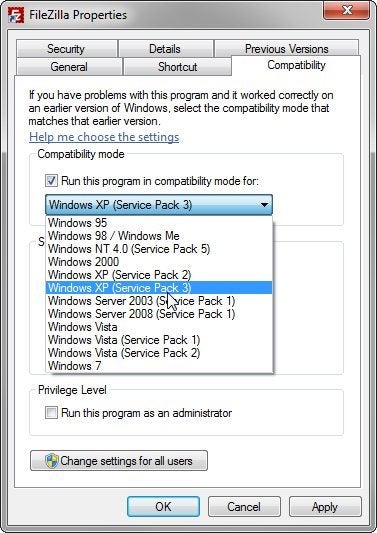
Run XP Software in Windows 7

For the most part, it should just work. I've rarely run into programs that run fine in XP but have trouble in Windows 7.
But if you've run into one of those rare programs, try running it in XP Compatibility Mode:
- Right click the .exe file or the shortcut and select Properties.
- Click the Compatibility tab.
- Check Run this program in compatibility mode for and select an appropriate option.
If this doesn't work, there's another work-around: XP Mode. (And yes, I know it's silly that the two solutions are called XP Compatibility Mode and XP Mode.) Unfortunately, this option is only available for Windows 7 Professional and Ultimate editions.
You'll need to download and install Windows XP Mode and Windows Virtual PC (be patient; it's a big download).
Once you're finished, you'll be able to actually run XP inside a virtual machine in Windows 7. It's not as smooth as simply running the programs in Windows 7--you're in an entirely different environment. Even the hard drive that XP boots from and runs off of is a virtual one.
But you won't be entirely cut-off from Windows 7. You will be able to access the real hard drive from within XP, and both versions of Windows will share the same clipboard
How To Set Your Photo As Your Pen Drive Icon?
Here is a trick that is to set your custom icon for your pen drive. Yes you can set your face as icon for your pen drive. This can be done by perform some simple modifications in the

To perform this, just follow the simple steps.
1.Plug in your drive and open it.
2.In the drive, create a text file and type the below code.
 That’s it. Now remove the drive and plug it again. Now you can see your photo as your drive icon. Don’t forget that it will available as your drive icon until you format the drive. Once you format the drive, it wont longer available. Comment your doubts and troubles.
autorun file of your pen drive. After you set up the icon, it will show your custom icon instead of the regular windows USB icon wherever it use (as shown in the below figure).

To perform this, just follow the simple steps.
1.Plug in your drive and open it.
2.In the drive, create a text file and type the below code.
[autorun]
icon="filename.ico"
icon="filename.ico"
3.Save it as autorun.inf
4.Then take the image file which you want to set as icon and convert the image to icon file with .ico extension with any image converter.
5.Place the .ico file in the drive.
NOTE: Don’t forget that the file name of the image should be same as the second line of the code which is in autorun.inf file.
6.Then hide both the autorun and icon file by right click and select hidden. (As shown in the figure)

How To Easily Change Windows 7 Password Without Knowing Old Password?
A Simple Hacking Trick Using Local User Manager
Many of us searched and searching for this trick. Some times, we need to change the password of a system without knowing its current password. In that case, if that system


Many of us searched and searching for this trick. Some times, we need to change the password of a system without knowing its current password. In that case, if that system
has Windows 7 OS, its very easy to change the password. We can easily done that without any complex commands and steps. Just read this article, it will surely help you.
For that if we go for “User Accounts'”, there its will ask for the current password too. So, if you want to change the password of an logged in Windows 7 system without knowing its current password, or want to play with your friend by changing the password of his system, just read more.
NOTE: The Windows should be logged in as admin to perform this operation.
Just follow the simple steps.
- Just open the Run box by press Win Key + R.
- Type “lusrmgr.msc” as shown in figure 1. (without double quotes")
- The “Local Users and Groups” window will be open as shown in figure 2.
- Double click on “Users” folder. All the system user accounts will be showed as shown in figure 2.
- Right click on the account name which you want to change the password and select “set password”.
- A warning will be shown as shown in the figure 2.
- Click on “Proceed”.
- The “Set Password” pop up will be opened as shown in the figure 3. Give the new password two times and click OK. That’s it, the password will be changed.
Enjoy and have fun with your friend. Comment your troubles. For more tricks, keep visiting.
FIGURES:
Figure 1

Figure 2

Figure 3
How To Remove Shortcut Virus From Pen drive/Memory Card Simply Without Antivirus?
Many of us had and having this problem. We have some most important data in our pen drives, what will we do if all the data are loss? At some day, all the folders which are in

 That’s it, just wait some seconds. Then open and check your drive. Your folders will be retrieved. I hope this is useful for you. If any doubt, comment below. Share with your friends. Don’t forget to subscribe us freely…
NOTE: This will definitely recover all the folders, but it wont completely remove all the virus, better you scan the drive with an antivirus.
You may like this too…

our drive is just showing as shortcuts in Windows (as shown in the above figure).
This problem may cause not only in pen drives, also in memory sticks, phone memories, external hard disks etc. If we trying to open those folders Windows will show an error that “Shortcut missing…!” We afraid of losing our data and somebody format the drive. But no need to afraid for this and format. Yes, this is a type of virus affection. Just follow the simple steps to remove that shortcuts and retrieve your folders back.
NOTE:No need of any antivirus software to perform this operation.
- After plug in your virus affected drive, just press Win key + R to open Run box and type “cmd” and press Enter key. (Without double quotes)
- In the opened command prompt, open your drive by enter your drive letter as shown in the below figure. For example, if your drive letter is enter g: and press Enter. (To find your drive letter just open “My Computer” and check your drive icon)
- Now type “del *.lnk” and hit Enter.(without double quotes)
- Finally type the below command and hit Enter. (without double quotes)
“attrib -s -r -h *.* /s /d /l”

NOTE: This will definitely recover all the folders, but it wont completely remove all the virus, better you scan the drive with an antivirus.
You may like this too…
How To Make Bootable Usb Pen drive For Windows 7 Or 8
Bootable Usb Pen Drive
Bootable Usb Pen drive is simple and fast way to format your PC or Laptop. After formatting you can easily install windows in your system. Bootable usb pendrive has several advantage as like easy formatting, easy copy and past windows file and after that easy to installing windows. Now we are discussing some important step to make bootable pen drive.Advantages :
- Installing process through bootable usb pen drive is much better then DVD.
- Easy to carrying.
- Easy to handle and no need to expert.
- Best option for all who haven’t DVD drive in his PC or Laptop.
Requirement :
- Blank (empty) Pen drive with minimum capacity of 4Gb.
Process :
Step 1 :
Plug-in your pen drive in Laptop.Step 2 :
Go to Start >> Type Cmd (in search program and file) [Press Enter]After pressing Enter command prompt will open.
On your Caps lock
Step 3 :
Type DISKPART [Press Enter]
Step 4 :
Type LIST DISK [Press Enter]It will show all available disk in your system. Disk 0 is usually hard disk of your system. In my case Disk 1 is Usb pen drive (This can be different in your case so plz make sure )
Step 5 :
Type SELECT DISK 1 [Press Enter]Step 6 :
Type CLEAN [Press Enter]Step 7 :
Type CREATE PARTITION PRIMARY [Press Enter]Step 8 :
Type SELECT PARTITION 1 [Press Enter]Step 9 :
Type ACTIVE [Press Enter]Step 10 :
Type FORMAT FS=NTFS [Press Enter]Wait Until 100% complete.
Step 11 :
Type ASSIGN [Press Enter]Step 12 :
Type EXIT [Press Enter] Now bootable usb pen drive is ready to use. After making this copy and paste windows 7 or 8 in your pen drive. It is easiest way to install windows 7 or 8 in your system.
Note :
Before making bootable usb pen drive plz make sure that you are using only one Pen drive at this time. This process is only for windows 7 or 8 not for Xp.Download (windows to flash )
Subscribe to:
Posts (Atom)